
Warframe Guide: Doing Tridolons Solo
Running out of Vosphor but you need some extra Arcanes? Wanna try your luck out for Arcane Energize? All your friends abandoned you in Warframe but you still want to do the Tridolon run? I got you.


Today we’re talking about doing Tridolons solo. We’re doing this with Trinity. Let’s get to the build.
We use Dead Eye for our Aura for bonus sniper rifle damage.
Primed Surefooted is there because this triple boss encounter will have a lot of knockdowns. However, Primed surefooted won't protect you from the push back that the Eidolon Stomps do. If you don’t have Primed surefooted, Handspring will do.
We’re using Adaptation over rolling guard because the damage reduction lasts longer and because you'll be spamming Blessing, you'll hardly take any lethal damage that would require you to Shield-Gate anyway.
Having said that, I still slotted in Primed Redirection in case I mess up my Bless rotation.
Moving on, we have Primed Continuity to increase the duration of Roar and Blessing.
We added a Primed Flow for more energy because of skill casting rotation. We will be casting Blessing, Roar, and Link a lot so we need a large pool.
We’re also using Blind Rage for Strength in tandem with Umbral Intensify to bring us over 250% Power Strength and that leaves these two slots. These two are flexible slots. You can put anything there, but as for me, I like to use two augments.
Because we subsumed Roar over Well of Life, I used Piercing Roar. This forces “Roar” to be Recastable and it's the only reason we're using it for this run.
Champion's Blessing is a huge help because it gives you crit chance per percentage of health you heal from your allies and yourself which caps out at 350%. Lures and your companion are counted.
As for the Arcanes, we got Arcane Rise for the 150% Damage on our Primary when we reload.
And Arcane Nullifier because every single Eidolon we'll go up against has some sort of Magnetic effect. The water has a magnetic effect. And it will be extremely annoying to get silenced every time.

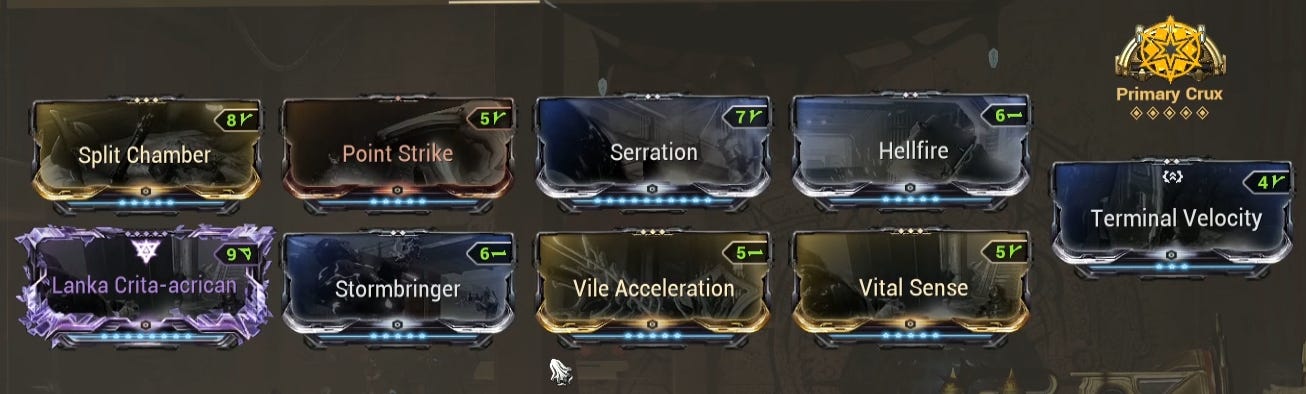
For our primary, we're going with Lanka. You can go with any sniper rifle but Lanka is my personal choice.
This is the build. As you can see, no fancy Galvanized mods or anything like that because those require us to ramp up the kills. For the Tridolon runs, we need the big, hard numbers right away. There's no room to ramp up.
So we got Split Chamber for Multishot. Point Strike for Crit Chance. Serration for Damage. Vital Sense for Crit Damage. Hellfire and Stormbringer for Radiation. Whatever Sniper you decide to use, mod for radiation.
Eidolon armor is weak against radiation so we’re using the damage boost from Dead Eye to Stack with the damage boost from the element. This is useful if we’re unable to strip the armor properly. This is especially important in the last Eidolon.
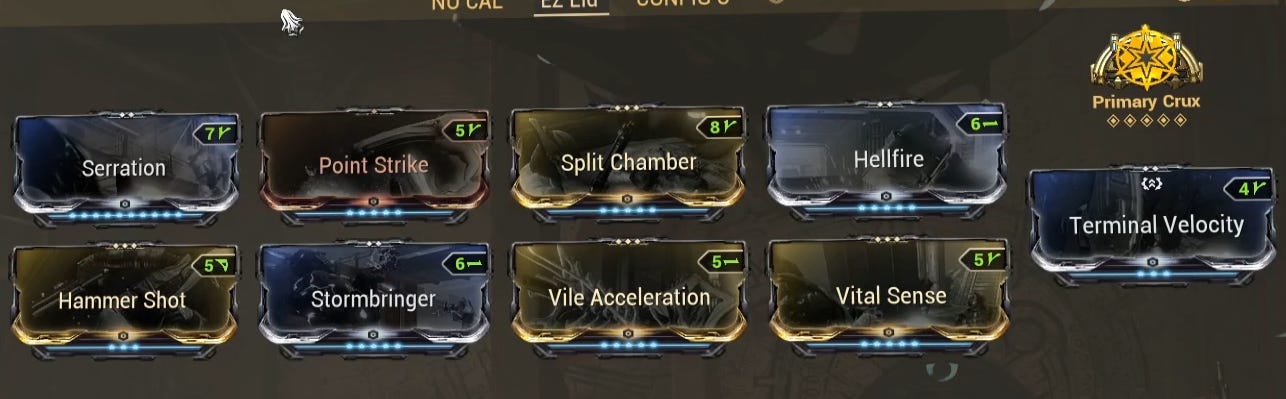
I'm also using Vile Acceleration for fire rate. Fire rate is extremely important with the Lanka because it's a charge weapon. Don't worry about the reduced damage. We'll pick up that slack with Roar and Dead Eye. And I'm also using a Riven. It's a CC, CD, MS riven. If you don't have one, I made an alternative build. I replaced the riven with hammer Shot for more Crit Damage.
For the Arcane, I'm using Crux mainly for Ammo Efficiency and the Exilus slot has a Terminal velocity because Lanka is a projectile weapon.
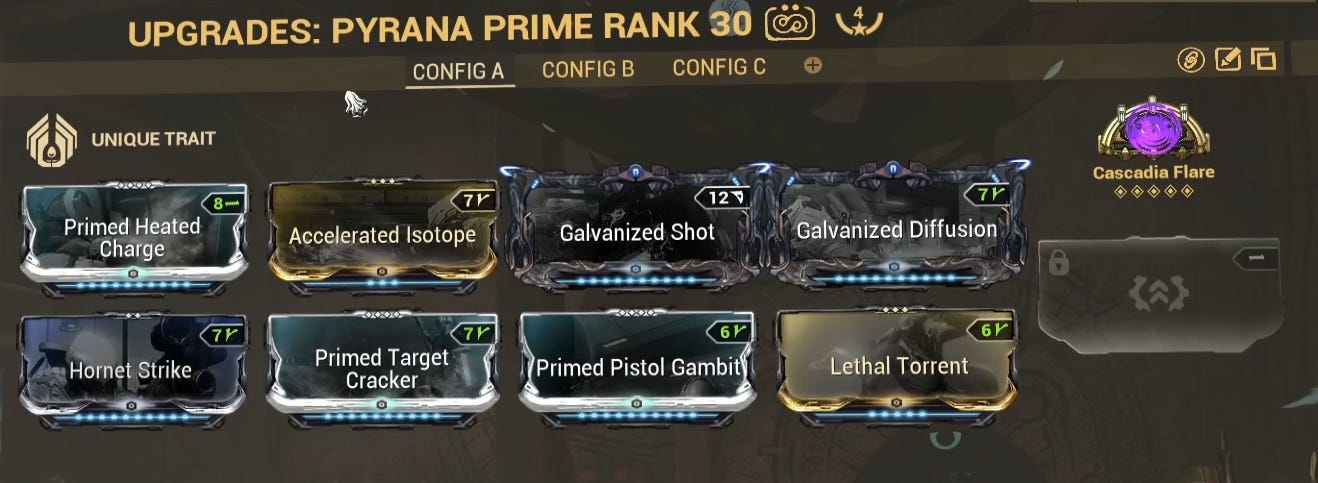
For the secondary, I'm using a Pyrana Prime but any high fire rate secondary will do. The main purpose of the secondary is to get Lures and break Voms. Because of that, the build isn't really important but if you wanna see it, here you go.
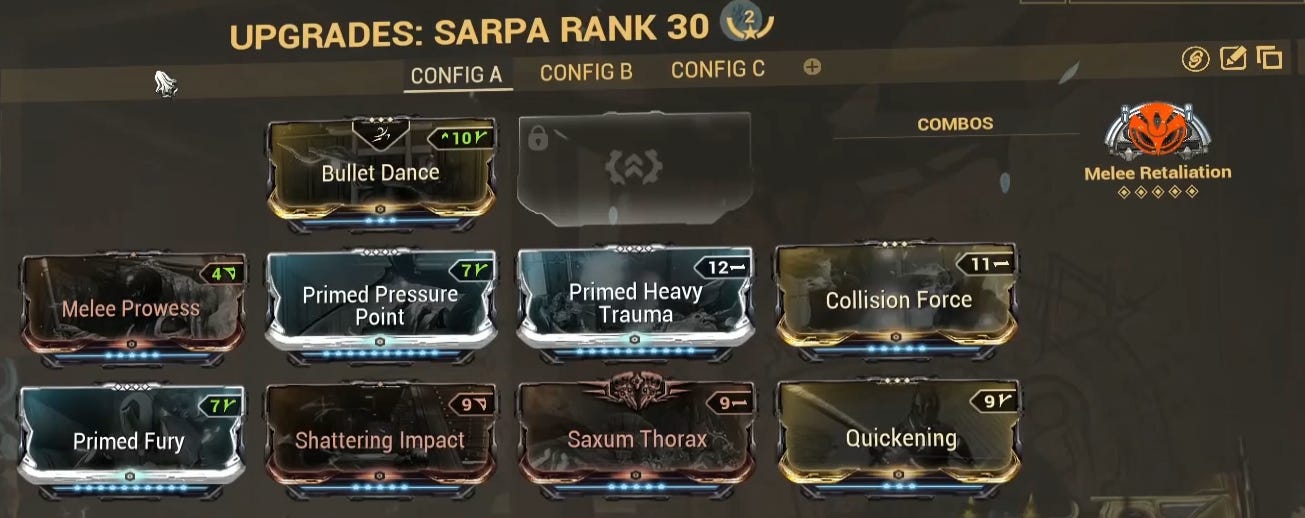
For the melee, I’m using a Sarpa. I use this to fully strip the armor of the first two Eidolons and to reduce the armor of the third one. My main mod here is Shattering impact. This is the only mod in this melee that is required. Everything else is just increasing the status weight of Impact.
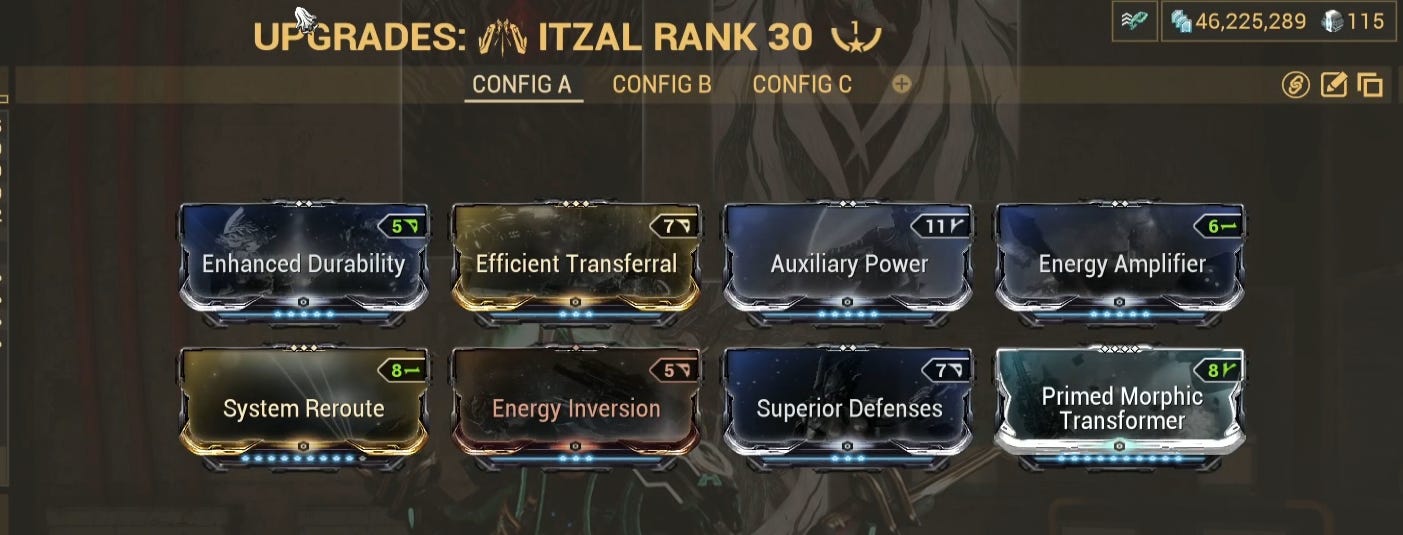
For the vehicles, I use the Itzal. We're using this because of the third ability which sucks up all the items within the area of effect. The build doesn't really matter because we're just using it for its third skill but I'll show you my build anyway.
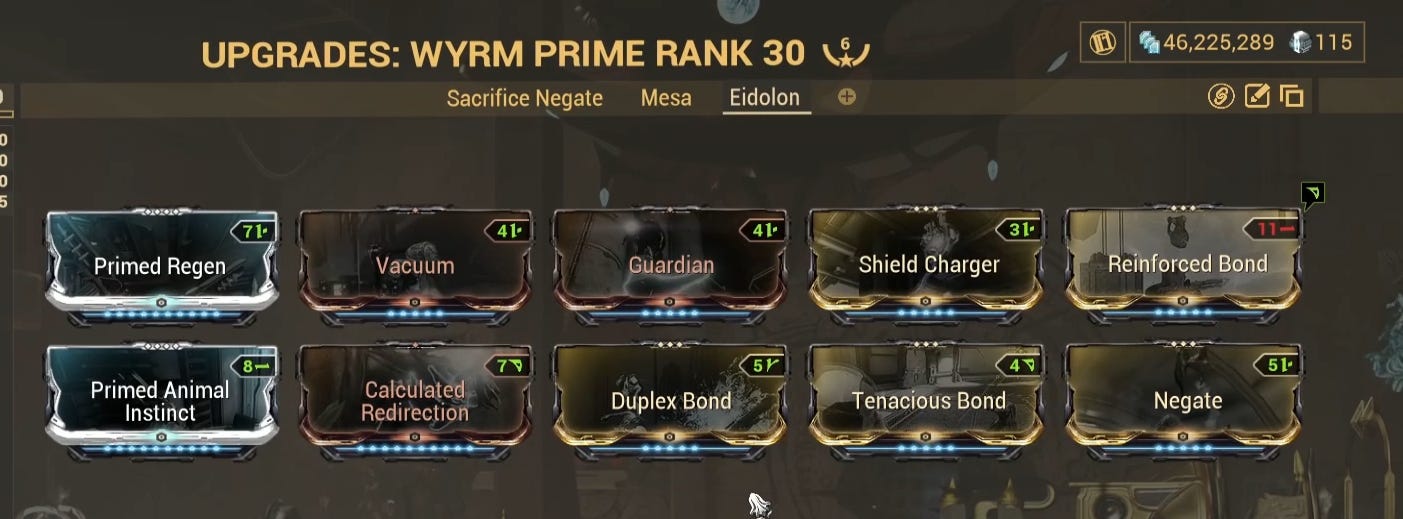
For the companion, I have a Wyrm built for fire rate buffing. I slotted a Calculated Redirection to proc reinforced bond because, again, fire rate is important because we're using a charge weapon. I use tenacious bond as well for more crit damage. This only procs when the companion's CC is over 50 percent so make note of that. The rest of the mods are just there for quality of life. Vacuum for resources. Guardian and Shield charger for regen and of course, Negate because why not. Duplex bond also makes an apprearance because I couldn't slot anything else there.
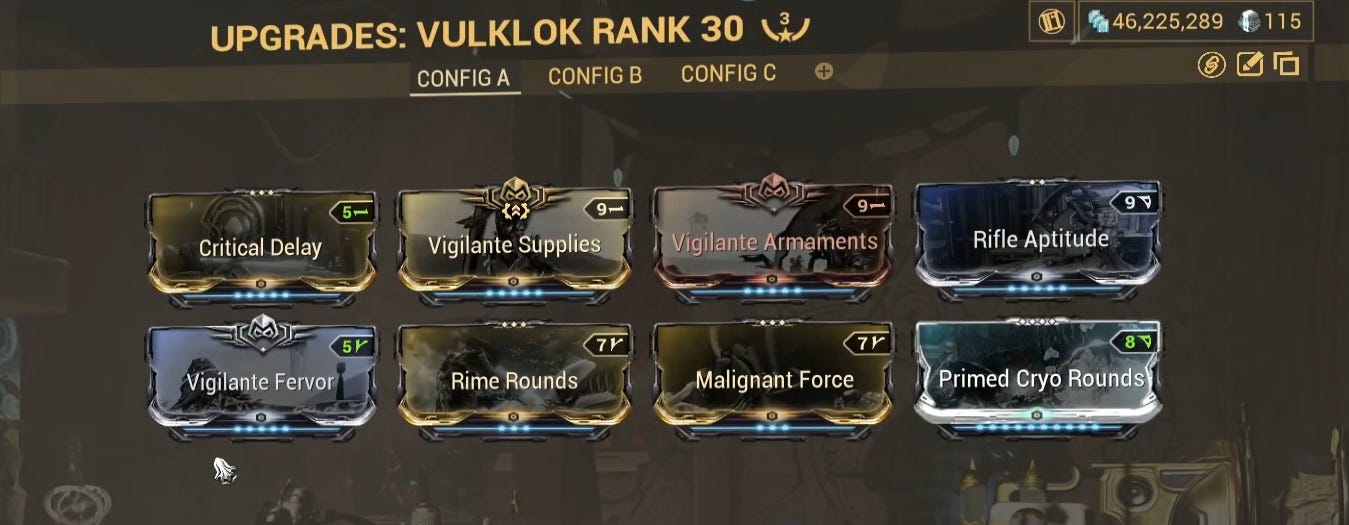
For the companion weapon, we're using the Vulklok for the high crit rate in order to activate Tenacious bond. Here's the build.
Make sure to pack some Ciphers and some Energy restores as well.
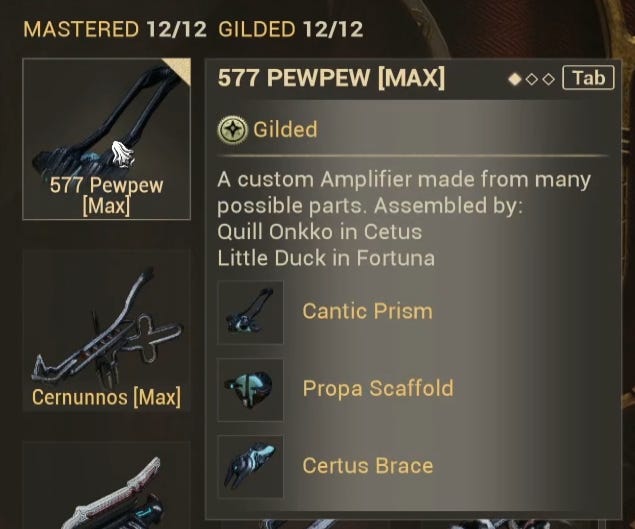
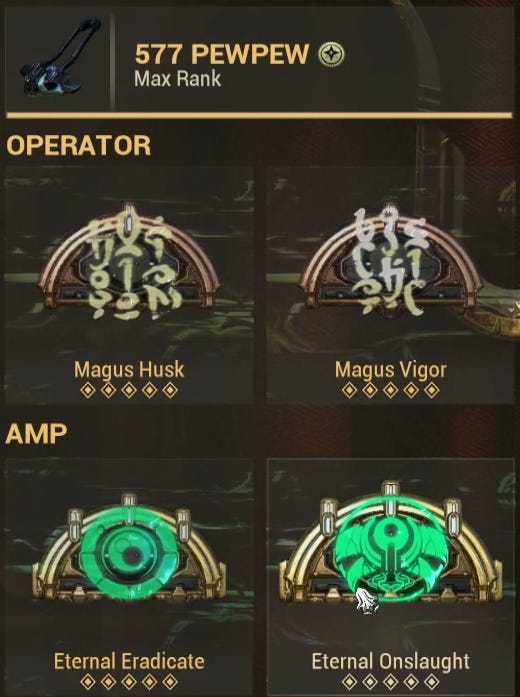
For the operator, we're using a 577 amp. Cantic Prism, Propa Scaffold, and Certus Brace. But if you're not quite maxed with Vox Solaris yet, you can also use a Klebrik, Lohrin, and Rahn amp, all of which are available in Onkko's shop. Of course, you can use the 777 Klamora, Propa, and Certus because that's the Meta but for me, I like the 577 so we'll be using that for the video.
For the Operator Arcanes, I'll be using Magus Husk for and Magus Vigor. Vigor gives me 600 health and husk gives me 300 armor.
For the amp arcanes, I use Eternal Eradicate for 60% additional Damage on Operator Abilities and Eternal Onslaight for 180 % Crit Chance when my energy is depleted. You can substitute one of these with Virtuous Strike but this is the build I recommend.
For the school, we will use Madurai for its abilities. We'll use Void Strike and Contamination Wave. Void Strike consumes all Energy and gives you bonus damage per energy consumed which stacks on our Eternal Onslaught's crit buff. Contamination Wave buffs our damage when it touches the Eidolon's weak points. so Juggling these two during the run is crucial.

Before we start the run, we need to talk about Lures first.
Lures are these things you see in Grineer camps at night. Their main purpose is tying the Eidolon down in order for it to be captured. Lures need to be charged in order for them to capture an eidolon. You'll know a lure is charged if you see the shield turn blue. Lures have their own HP and shields so if this goes to zero, they will perish.
Remember that you'll need 2 charged lures for the Teralyst. 3 charged Lures for the Gantulyst. And another 3 charged Lures for the Hydrolyst
Lures are charged using Vomvalysts. Vomvalysts, or Voms, are these smaller Eidolons that heal the bigger Eidolons. They're found near water or near grineer camps. You can force them to spawn by aiming down sights when you're about 150 meters away from their usual spawn sites. But to do this, you'll need to memorize where they usually spawn first. Again, they usually spawn near bodies of water or near grineer camps. Their spawn rate is shared with animals in the Plains so if you have a hard time spawning them, your next best bet is to break the Eidolon's shields and attack it with your secondary. This will force voms to spawn nearby and you can use that to charge your lure.
Okay, that's pretty much it for the basics. Let's do one full run.
We need to move fast because, remember that we only have about 50 minutes to do this. I know it says that Night lasts for 1 hour but with all the walking, and how long this damn door takes to open, you only realistically have 50 minutes to do a Triple Tridolon run.
Now, hop into Cetus at night. Get the Tridolon bounty if you want but remember that walking to Konzu and back to that door will just take up more of your time. The moment you hop out the door, head left and grab a lure. Look for the Eidolon. Mark it. Get a lure and charge it.
We're charging this one Lure because if we grab more than one, the other Lures will take some of the vom charge away therefore taking them much longer to charge. Once the shield is blue, go to the Grineer bases and get more. Get at least 4. We'll charge the rest while we're attacking the boss.
Once you’re at the boss’s feet, go to operator mode, cast your first skill and shoot the boss. It shouldn't take more than 2 shots to deplete the entire shield pool if you built your operator and your amp the way I did. After this, go back to your warframe, switch to your primary, and proceed to shooting the weak points. The first Eidolon has 4 weak points. Two in the arms and two in the knees.
After shooting the weak point, the boss is knocked down, it screams, and the shields will heal. As it's getting up, go back into your operator and cast your second skill 3 times, wait a bit, and cast it a 4th time. This will ensure that your energy is drained which procs Eternal Onslaught, giving us crit chance. The shields should still go down quickly. By the time you're ready for the next weak point, you'll see that our first skill has cooled down. We can use it again to quickly destroy the boss's shields. That will be our rotation till the end of the run.
Operator. First Skill. 1-2 shots to deplete shields. Shoot the weak point. Operator. Second skill 4 times to deplete energy while shooting the boss. Shoot the weak point. Operator. First skill. And so on.
We’re doing all this while making sure to get in at least 5 full rounds of Sarpa shots onto the Eidolon. It doesn’t matter if the damage is Gray. All that matters is the shots hit the Eidolon. This procs our Shattering Impact, reducing or even stripping the enemy Armor. You can choose to keep some of the armor for more Radiation bonus, or fully strip it for more Raw Damage bonus. Because you have Roar and Deadeye, you’ll be fine either way. I do both fully stripping and not fully stripping in my runs
Also, make sure you're casting Roar for the damage buff and Blessing because we don't want any of the Lures to die.
Each time the weak points explode, the Eidolon also collapses. You can take this as a sign to go look for more voms to help charge your lures.
Once all the weak points are gone, it will collapse and go into the thrashing state where it calls more voms to go try and heal it. This is where we get the majority of voms we can use to charge the other lures.
Once this is over, we go to one last damage phase. Hit the Eidolon in the face for some headshots. When it gets to zero, the capture animation will play. The lures will explode afterwards, giving you the drops for this particular Eidolon. Cast Itzal's third skill to get everything and rush toward the center of the lake.
We slot in a Radiant Eidolon shard in the altar at the center of the lake here to summon the next boss: The Hydrolyst. While the summon animation is playing Rush toward the nearby camps to get more lures. Get two if you can but 3 would be ideal.
This one has six weak points. 2 in the arms. 2 in the knees. And it has another 2 in the back. It's pretty much the same process. We still charged lures from the first encounter and those two should be enough to hold the Hydrolyst down till the thrashing phase. We proceed as usual, eliminating all weak points till it collapses and starts calling for help.
We finish it off in the final damage phase, use Itzal's third skill, go back to the middle of the lake where we summon the Gantulyst, and grab a couple of extra lures,
This encounter plays similarly to the second boss but it summons these raindrops that damage everything in the area of effect. Plus, during this phase, Vom Blooms appear. They're these purple clouds of energy that make voms invincible. When you see them, destroy them along with any voms that spawn. Then, it's pretty much just the process of eliminating all weak spots, going into the thrashing phase, and proceeding into the final damage phase while making sure that there are no Vom Blooms nearby.
Once this is done, rush out of the door and repeat the process all over again.
As you can see, this one took this long to do.. And that includes me showing you where voms spawn and showing you what lures are. So realistically, you can do this more quickly. Using this mission duration as a factor, you can even do a triple tridolon run solo.
Don’t believe me? Just click on this video here to see how I did it with the build we just talked about while solo.
If you just want to see just the highlights, I condensed that run into a much shorter video.
If you want more guides like this, go ahead and subscribe.